Using the image viewer
Besides visualizing images in the main map view, HxMap provides an image viewer for closer inspection of collected imagery data.
Loading individual takes into the image viewer
The image viewer will display full takes which can be loaded in two ways:
through the data source tree: righ-click on an image take and select ‘Display take’ from the context menu. The take is then loaded either in the image viewer.
through the map view: keep <Ctrl> pressed on your keyboard and double-click in an area on the map view where there is imagery data. HxMap will then determine the image take at this location and open it in the image viewer.
Image Viewer Layout
The layout of the image viewer differs between the Session and QC Perspective due to the difference in functionality that is available. Before Ingest the individual images are not georeferenced yet and it is therefore not possible to display them in ground space or draw defect polygons. Additionally, only Session Perspective allows to toggle between thumbnails and on-the-fly preview (if available for the sensor used).
Session Perspective | QC Perspective |
|---|---|
 |  |
Common toolbar elements
 | Product selection for display. Filter product list for product type AERIAL or ORTHO, if desired. |
 | Toggle between RGB/ CIR display in case a 4band product has been selected. |
 | Drop-down menu to pick a specific zoom level |
 | Arrow buttons to move to next/previous take or flight line |
 | Checkboxes to toggle visibility of view directions and layers |
Session Perspective only
 | If the sensor supports it, allows to toggle between thumbnails and on-the-fly processed raw images. |
QC Perspective only
 | Toggle between image space and ground space view |
 | Launch the image adjustment tool |
 | Capture defect polygons |
Toggling between image space and ground space
In QC perspective, the image viewer offers two distinct display modes:
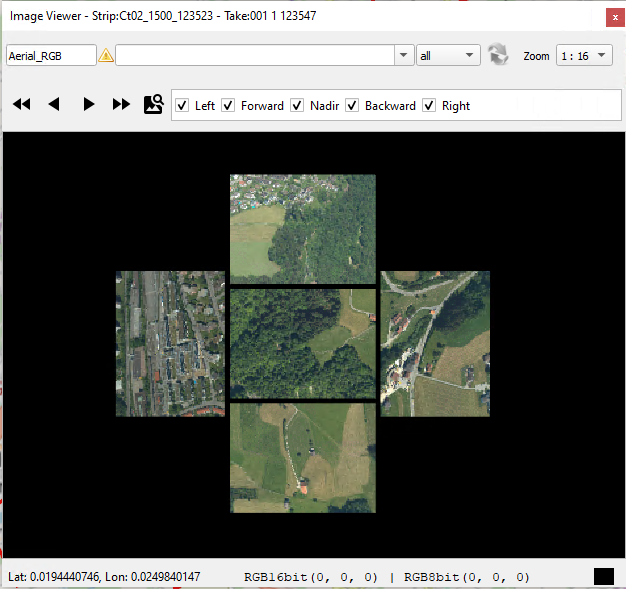
Image Space
In image space, all captures of a take are laid out according to their position/orientation within the sensor system. Images are oriented so that flight direction shows upwards, while the tail of the aircraft would be at the bottom of the screen.
The checkboxes in the toolbar allow to control which views to display. Examples are shown below for an RCD30 Oblique Sensor:
All views | Only Forward/Nadir/Backward |
|---|---|
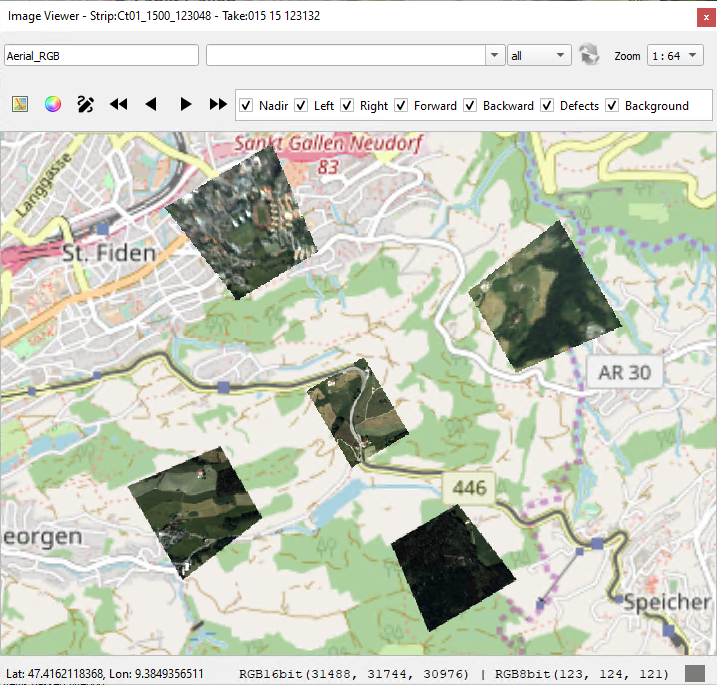
Ground Space
In ground space, all captures of a take are projected onto the ground surface and shown on top of an map layer. This allows for quick verification that the georeferencing is correct. Images that and up at the same location will be stacked on top of each other. In this view the orientation is north-up.
All views | Only Forward/Nadir/Backward |
|---|---|
Navigating between takes and flight lines
Arrow buttons in the toolbar of the image viewer allow to quickly move from one take to the next. The single arrows will change to the next/previous take within the data source tree. Double arrows will load the first take of the next/previous flight line. Alternatively, keyboard shortcuts ‘D',’S','W','E' can be used.
Navigation will only consider the takes that are visible in the data source tree. Takes that have been filtered out will be ignored.