Mosaic adjustment
Once the association of the different types of orthos to the images have been done, it is time to radiometrically adjust the imagery to each other.
This process is done in two steps:
Create histograms and collect tie points
Run the radiometric adjustment
Both steps are launched through the mosaic toolbar of the perspective:

The first step is the more time consuming as all imagery has to be analyzed to create histograms and collect the tie points for each image. After clicking the toolbar icon the user can choose if he wants to run this process either locally or send it off to the processing cluster.
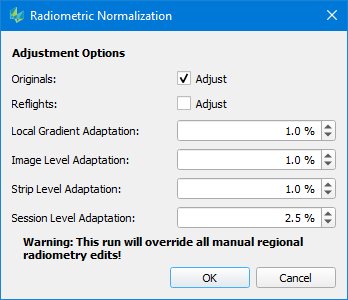
Following this step, user can then launch a radiometric normalization. Clicking the toolbar icon will bring up a dialog window that allows to define the adjustment options to be used for the normalization:

Selecting Originals/Reflights allows the user to specify which data he wants to be adjusted.
By adjusting the threshold values for Local/Image/Strip/Session adaptation, the user can additional define the maximal radiometric changes allowed. Adjust these values if your project includes large radiometric differences. (e.g. seasonal differences between flight sessions might require a larger adaption threshold on session level).
The "Run adjustment" dialog allows to select, which data shall be modified by the adjustment process. Press "OK" to start the process.
Once computed, HxMap will preview the effect of the normalization in the central map view.
This processing steps will overwrite the adjustment values captured for each image in the mosaic project file. Any adjustment done to these values (e.g. by applying some regional edits) will be overwritten by this step.
Switching between adjusted and unadjusted imagery
Once finished, the user can compare the unadjusted vs. the adjusted image data by using the button "Switch between..." available in the toolbar

Also, the log information allows to review the adjustment process.