Capturing of new objects

Define the capture function by pressing the "Capture Object" button in the toolbar. The capture function dialog opens:

Define the capture mode by selecting the object type, color, layer to use and give it a name.
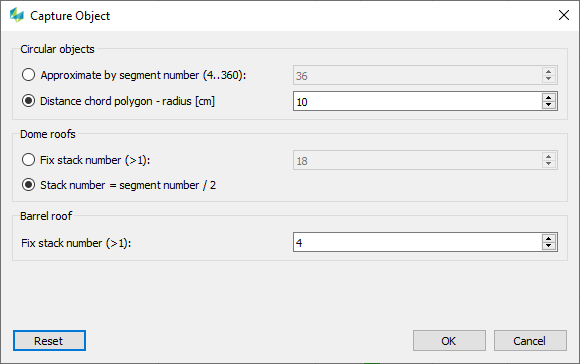
Setup parameter for the display of roundish roof types like tower, dome, cone and barrel roofs.
With the capture functions defined, it is now possible to capture a new object by selecting a capture function from the context menu (right mouse click) “Capture Object”.
The list can be adapted by the user. With the “Import…” it is possible to import a capture function list from another editor project (*.hxedt).
Constructional orders for capturing of roofs
First of all the object must be constructed completely, before you can apply any corrections. Please follow the given order (1,2,3,…). Points with a number in brackets will be constructed automatically if the option “Auto Set Last Point” is set.
If this option is not checked all points need to be set manually. The ground points will automatically be measured by the given DEM. If the option „Auto Repeat“ is checked you can capture automatically the same roof type continously without selecting the capturing function again.
Detailed instructions for the order can be found in the Appendix of this user manual.
Drawing new options in the stereo view
Move the cursor to the first corner and click to set the first node in the left image. The height of the point (or position of the cursor in the second image) can be done by click-and-drag of the right mouse button. Click to finish setting the first node.
Continue by placing additional nodes for the roof corners. HxMap will automatically span up the edge lines.
After placing the final eaves point, HxMap will then switch to allow adding the ridge points.
Once the final point has been set, HxMap will automatically expand the roof captured with the DEM used in the editor project.
The captured object will get an automatic GUID assigned and become selected.
In the stereo capture mode, the position of the cursor stays fixed while moving the mouse will pan the background image.
Rectangular Mode

While capturing an object it is possible to switch on/off the Rectangular Mode by using the F12 shortcut. This functions gives the opportunity to capture an object with an exact 90 degree angle.